Fuck you, Photobucket, you god damned piece of shit!
My pics are all fucked up (bandwidth limit exceded) until the 22nd. Which I guess is one way to find out the people are actually looking at them...
Friday, June 12, 2009
Wednesday, June 3, 2009
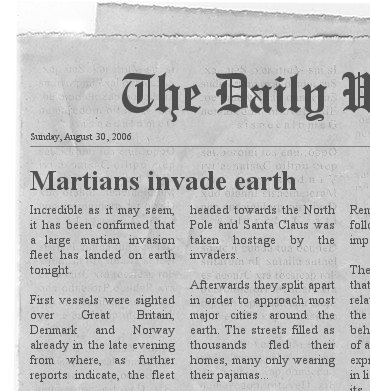
Peacekeeper Pulse Pistol
Since I've had so much fun playing with toy guns lately, I went ahead and finished this:
It's a Peacekeeper Pulse Pistol from Farscape. Gods, I loved that show... Anyway, I picked the resin kit up at DragonCon last year and only now got around to assembling and painting it. Its a butt-simple kit, just clean and fill casting problems (none were major, just a few burrs and bubbles) and glue on the laser targeter.
That picture sucks, but I wanted something quick. It doesn't show the nice, subtle finish at all, so I should take a better pic at some point. But the gun isn't just plane old black, I used a metallic dark gray spray paint with brass flecks in it, the label calls it "Oil Rubbed Bronze." Then I inked it black, then lightly resprayed it lightly from above as a highlight. It looks black in anything short of direct light, but when the light catches it you get a subtle brass effect. Its just slightly cheesy -- just like Farscape.
Tuesday, May 19, 2009
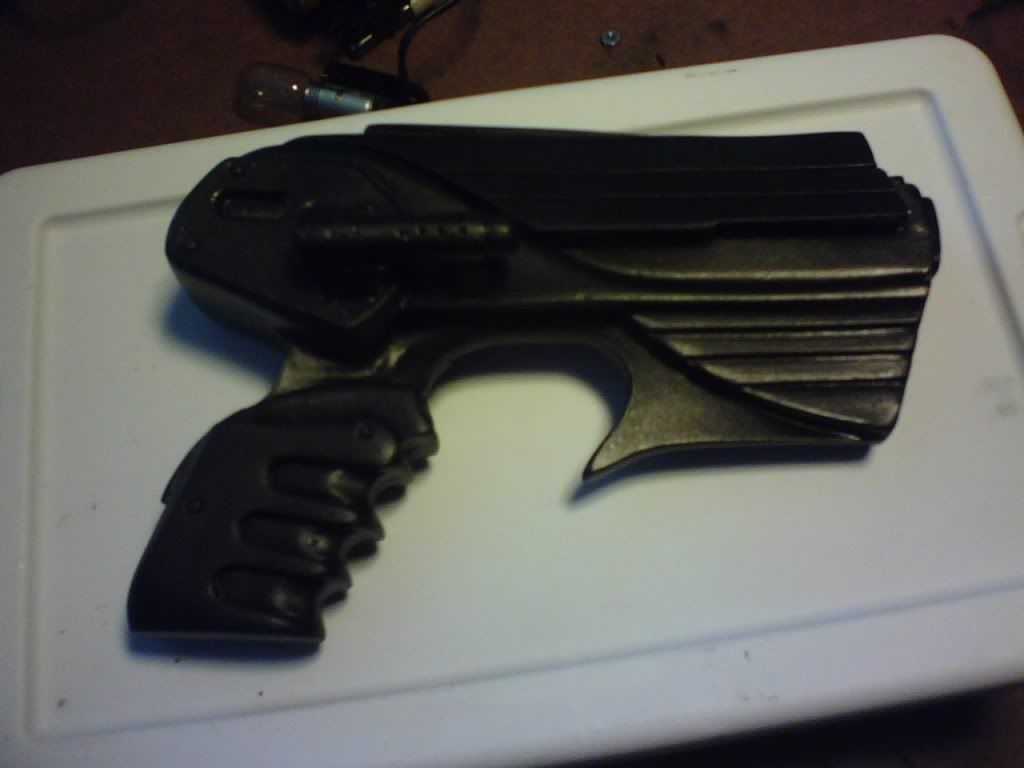
Old School Head Phones
I picked up a pair of old crystal-based headphones at an antique shop in Huntsville a few weeks ago. Now, there are those who would loose their minds at me tearing up an old antique, but fuck it. They didn't work anymore. Not like an old sextant or something that still did its job but there were new ways to do it, I mean these things were just junk. Attractive junk, but junk none the less. So, I retrofitted them with modern speakers and cabling and now they work great and look cool, to boot.
I more or less followed the advice and design Molly Porkshanks used in her headphone mod, but I followed through on the bits she said she didn't have the patience for. Which basically means I desoldered the speakers from their wires, ran them through a boot lace, and resoldered the connections. This allowed me to run the wire through an existing hole in the ear cups without making any new cuts.
Anyway, I wouldn't really count these as a project in unto themselves, but they are definitely a nice addition to the collection. And they are wicked fun to wear at the office! At some point I'll try to take a decent picture of them, but that will probably wait until I've got a finished project that will make use of these headphones.
Wednesday, May 6, 2009
Dr. Emmett Spengler’s Spectral Scope
 I’ve been saving the best for last.
Out of this first batch of 1:1 scale releases from the workshop, I started this one first and finished it last. It was the most fun, uses the most “real stuff,” (that being actual metal and such, not plastic crap painted to look like metal), almost kinda sorta pretends to work, looks the best… I really like this one. In fact, I liked it so much that I failed to let her go… originally, like the Guitar Hero controller, my plan was to knock this out quick and give it to a friend to get him all excited about this crap. But then it grew, both on me and my work bench, until I just couldn’t give it up. So now it’s mine, all mine, precious. And I’ll have to find some other way to motivate him. Maybe I’ll let him build a forge out in my barn.

Obviously inspired by Doc Brown’s wacky rifle scope in Back to the Future III, which I can’t actually find a picture of at the moment, the initial parts for this thing just seemed to fall together. The rifle is an old Daisy BB gun – I don’t think they even make these things any more. This one had already stopped firing by the time it came to me. The action still works, the trigger pulls, and it feels like air is getting released somewhere, but it’s been a long, long time since anyone even had the chance to shoot their eye out with this rifle. On the off chance that I come across another one of these classic, mom-hated toys I made the scope completely removable. Since I was working on the thing, anyway, I gave the metal parts a quick paint job. Looking back, I’m not entirely happy with the paint I choose (the color is pretty close to the original, but I tried one of the “hammered texture” paints and sort of wish I hadn’t) but hay, thems the breaks.

I did add one little detail to the rifle itself. Conceptually, I’ve always liked the idea of more-or-less conventional fire arms with outlandish optics and crazy specialty ammo, and that’s what I’m gunning for here. To that end, the only thing I changed in the rifle itself was to add just a dash of the anachronistic to the fore grips. This would be a reasonable place to add things on a real, working gun… and the plastic front grip was slightly cracked anyway. So I dug out an old light saber spoon included in a box of cereal at the time of Phantom Menace’s (http://www.starwars.com/movies/episode-i/ ) release. Don’t fret, collectors – I’ve got a few more spoons stashed away in mint condition. What’s this little glowing thing supposed to do, you ask? Clearly, my good reader, you’ve limited experience in hunting the less-than-visible creatures lurking between this world and the next!

The two main parts for the scope are the rear end of an actual telescope and a brass match stick holder, both picked up at the thrift store. I was holding onto the match stick holder, just because, and saw half a telescope sitting on a shelf. When I picked it up in my other hand, it just felt right to stick the two together. The rest is really all just mounts and dressing. I painted the telescope parts brass and copper to cover the original glittery silver, and wrapped a scrap of leather around the ugly spot where the labels used to be. I wish I’d gone with brown, rather than black, but all the scraps I had on hand at the time were ugly in some way or another, so black it is.

I replaced the plastic focusing knobs with brass drawer handles, but kept the working action so turning the knobs still moves the eye piece back and forth. I also added a small lense to the inner end of the rear most part of the eye piece. The telescope only had one lens left in it by the time I got it, and one lens just wasn’t gonna cut it! There is no proper optical relationship between these lenses, they don’t actually magnify anything, but you can at least tell that they are there.

Next came the big “out board” lens on the front of the scope. Its plastic, scavenged from a child’s bug keeper jar. It was also hollow on one side, so I filled it in with putty. This gave me a nice working area, and I couldn’t resist adding some characters from an old esoteric script I found in an old wicca book, along with a few spear tips taken from Lord of the Rings miniatures. Then I masked off the lens and spray painted it in a hammered finish copper. I’m reasonably happy with the way it looks (except for the bit where the lens got messed up by a bit of putty) but the optics on this thing are horrible, and rendered the scope optically non-functional. At least before you could see a small, upside down version of the world through the scope; now, nothing.

With all the major components in place, the real chore could begin – mounting the thing to the rifle. I really didn’t want to mount it in a permanent way, but I started this project before learning to solder and before I’d built up much of a collection of little metal bits. As a result, there is more steel and epoxy involved with the mounting rail than I’d really like. The rails themselves are copper wire cut from a coat hanger and bent into shape. A copper wire mount at the front and a few steel shelf brackets at the back hold the weight of the scope to the rifle, while the rails keep it all in balance and hold on the out board components, running right through the plastic around the out board lens. I used some copper-painted Legos to fix the back end of the rails to the scope, and later soldered them to the small supports in the middle. Springs and steel nuts and washers keep the alligator clips and out board lens from sliding about. At first it was just resting on the middle supports, with the copper rod under tension, but after I learned how I soldered it on at this point. The entire scope can be removed as a single assembly.

Even though the large, external crystal was part of the original concept it was one of the last details to be added. Not being one to spend a lot of time in hippy shops, it took me a while to find the right crystal. But eventually I found a few I liked at a convention and mounted them inside a part of goggle inserts. I used a Dremel tool to grind out the center of the inserts and then set the crystals in place with 2-part epoxy. The requirements for multiple focusing crystals should be obvious, considering the different etheric reflectivity properties expressed by the various eldritch horrors with which one might be forced to contend. Perhaps later I’ll make a pouch of some kind, to keep these and any other lenses handy.

At this point I thought I was more or less done, but as I was sorting through a box of old bits I found that little brass eye piece I’d picked up and realized this was the project it had been waiting for. It seemed just the right size to stick on the back end of the scope, and its funky little mounting arm would sort of balance all the crazy out board action up front. So I put it on there, and took a look – and IT WORKED! By a serendipitous trick of the optics, that last little lens tied all the others (four lenses in total) together into something fun. No, you can’t use the scope to better view far off objects, that would be too mundane. But you can look at the pretty crystal. Hay, it’s better than the vague blur you used to see through it, and I’m sure this too has utility to the intrepid hunter of that which bumps the night. This picture is actually the view from the business end of the rifle -- the angle you really don't want to be looking from!

She still needs a decent sling to really be complete, but now that she’s done, I think I’ve found my character’s general use weapon. Anything bigger, like say a machine gun, would only be used on special occasions…


ClockWork Dragon

This item comes from the hand of my lovely assistant, Artemiss. All I did was spray paint the thing, all the construction and detail work is hers. Personally, I'd have gone a bit further with the detailing and brought out all the molded hydraulics and such, which she felt would make it look too busy. But it’s a cute little bugger, so here it is.

Inspired by the clock work owl in Clash of the Titans, Artemiss' intent for this piece was to make a cute little pet to crouch on her shoulder. Built primarily from Lego Bionicle pieces, most of the skeleton is stock parts but some were modified – grinding, as the kids say these days.

The wings use the same vinyl contact paper we’ve been playing with lately.

Most of the metallic paint was sprayed on via rattle can, with some detail work done with metallic ink pens. The gold wing spines were done in metallic ink because we weren’t sure how the soft plastic would react to the metallic spray paint.

For final detailing, she added gears, cogs, and various other little watch parts.

And he’s got a watch face for a breast plate.

She’s still got some future modifications in mind. The back opens into a small compartment, and we’re thinking of making something that looks like recording apparatus inside, to better fulfill this guy’s intended surveillance missions. She also plans to fashion him a small leather shoulder perch.

Monday, May 4, 2009
SteamPunk Guitar Hero Controller

This is the cheeseiest thing I’ve ever made. But it sure was a crowd pleaser!
I don’t have a cool name made up for this or anything like that, it just seemed to make something tongue in cheek seem too serious. I originally came up with the idea to do this for a few reasons:
1. I wanted to test the vinyl contact paper over lager, flatter surfaces
2. I like the idea of making every day item look less lame
3. I hoped to kick start a few friends of mine into doing something, anything, more interesting than downloadable content.
On all counts, I think this was a success: the contact paper worked about as well as I figured it would (re: good enough, but it won’t fool anyone at arm’s length); it definitely looks less boring than the stock XPlorer controller; and the friend I barrowed the controller is currently trying to make an old SuperSoaker look like an anti-tank rifle. And when we brought it out at a recent get together everyone seemed amused, which was nicely gratifying. So, what are we looking at here?

I didn’t do much on the inside. I considered some of the strum bar modifications I’ve read about online, but in the end I decided I was doing too much work making it look pretty to chance ruining it on the inside, so in the end all I did was pad the fret buttons for firmer contacts.
I don’t want to go on at length about design philosophies and artistic inspirations, so I’ll just say this: in researching this project I looked at a lot of SteamPunk and CyberPunk themed guitars. Like, real guitars. On trend that stood out was a general desire to make them look as little like actual musical instruments as possible, while retaining musical functionalist. Since I was starting out with a fake musical instrument, it seemed kind of redundant to make it look less like one. Thus, I went the other direction with it and did everything I could to style this fake musical instrument after a real one. What if there was Guitar Hero, but no plastic? Hence, wood grain.
The big structural change is obviously the exposed steam tank. After disassembling the controller I cut off one of the flying wedges and played with various shapes that might fit in there, eventually settling on an old stand-by, the stick deodorant dispenser. This one came from a recently depleted Old Spice product, with holes hacked into it so the controller’s supports could pass through the deodorant can. The can itself was fancied up with a reinforcing band cut from plastic and screwed into place. The little boiler plate was fun – I cut three circles from scrap plastic, one slightly smaller than the other two. I glued them together like a sandwich with the smaller circle in the middle, creating a thin seam that would be more visible than just sticking the plastic together. I then drilled holes all around the edge and glued in little brass nails. The small mechanical parts are just some Lego Bionicle parts added for flavor.

The whole subassembly was spray-painted copper, then masked to show just the reinforcing band (with its screws removed) which was spray-painted with a “hammered finish” copper. The Lego stuff was brush painted in accenting colors and the whole thing was gloss coated. When dry, I scraped the paint off the nail heads then soaked the boiler plate with several coats of thin ink to build up the stain. During the final assembly of the guitar I ran several nails through hole’s I’d drilled in the deodorant can and the body of the guitar to hold it in place.

The main body and neck are both covered in the same wood grain contact paper as this ill-named blunder buss. As with the earlier project, I heat-stretched the vinyl with a Bic lighter after cutting it into very roughly the right size. All the fittings were painted brass before applying the wood grain. The hardest part was stretching it over the edges around the inside-curving flying wedges. I don’t know if that makes a damn bit of sense, but it took a lot of time to get the wood grain on there smooth. At points, well… I got it on there as smooth as I could. There’s only so much you can do once you get the stuff out to the corners.

The vinyl on the neck is the same pattern as on the body. Before applying it, I laid it out flat and stained it with a mix of brown acrylic inks, then sprayed it with a matte finish clear coat. Without the clear coat, the ink would just come off on your hands. With it, the vinyl didn’t stretch quite as well as it had before, and was more prone to breaking when stretched.

After applying the wood grain I cut slits through it to expose the brass frets, then hit the “front” face of the neck with a very thick coat of high-gloss clear coat both because it looks better glossy and to hold down the edges of the vinyl around the frets.

Details on the neck include faux tuning knobs made of brass-painted Lego cogs….

And these fancy fret buttons. I masked off the edges, both to keep their action smooth and so you could see the original button colors, then hit them with textured spray paint. When dry they got their metallic colors, brass and copper for the yellow and orange buttons, silver for the rest. The silver buttons were then touched up with colored metallic brush paints. I didn’t clear coat them, but I wish I had – after just an evening of play, paint ware is already visible on the fret buttons.

The control panel was a fun little bit, but not involved. The plate was spray painted brass before the wood grain sticker was applied then cut away. The buttons were all removed and sprayed with a metallic black (the D-pad was ground down to a cross first).

The Start and Back keys are old shirt buttons with printed labels applied, then a coat of brush-on varnish to finish the look. I keep meaning to add something cool where the X Box logo used to be, but so far nothing has jumped in front of me.

The strum bar was a total pain in the ass, and went through three versions, each one a desperate attempt to salvage the morbid failure of the previous design. I’m happy with the final version, but if I’d planned on making it like this from the start I could have gotten a much tighter coil on the copper wire. Oh, well, live and learn.

The pic guard is one of my favorite elements of this design. The old guard was removed and cut to match the line of the exposed steam tank, then both parts were spray painted brass. I picked a small section of the Perry Reese world map, printed it out, and fit an interesting bit of coastline onto the pic guard. I cut it to shape so that the beveled edges of the guard would still be exposed, then glued it down. After that was dry I gave it several coats of brush-on varnish.

The whammy bar didn’t need very much, and I didn’t want to replace the bar itself, but it definitely needed something, so it got this little Bakugan, glued into a ball and painted brass, silver, and copper.

The vacuum tubes across the top don’t do anything, but they sure look sharp! I went through my box of spares and picked out pieces with different internal structures and recognizable logos (in this care Motorola, RCA, and Zenith.). I cut holes for them in both sides of the controller, and glued old pen body tubes inside to help support them. After assembling the guitar, I worked 2-part epoxy onto just one side of the holes (important to be tidy here, else you’ll glue the controller shut) and stuck them in.

So, she’s a pretty face, but can she play? Well, yes, in a loose fashion. OK, that’s not really fair. She plays just fine, in the sense that all the buttons still work and everything. And the padding on the fret buttons is an actual improvement over the original, they feel much tighter now. But… I lost a piece. Somewhere along the way, I lost a grommet that held one end of the strum bar firmly in place. The mounting rod still goes through the strum bar, and fits tightly at one end, just not at the other. It still makes the proper contacts and everything – one friend actually claims to prefer this new, looser strum bar style – but personally I don’t care for it at all. In fact, the loose strum bar is a big part of why the Xplorer is my least favorite controller for actually playing Guitar Hero. The lost grommet is something of a disappointment, as this is even worse than factory standard, but hay. Shit happens.

As with any project, there are things you take away from them and things you’d have done better. Not misplacing that strum bar grommet tops the list, and since I killed on Nerf gun in a similar manner I’m obviously going to need to work harder to not loose things when taking stuff apart. It would be nice if the wood grain laid down a bit flatter at the corner tips, but I’m not sure what I can do about that. Keep practicing, I guess. The strum bar and fret buttons both look good, but I feel like they could have come out better, especially the copper coil on the strum bar. If I’d intended to do it like I ended up doing it, it would have been a bit better. But that’s just art, or so my real artist friends tell me.
Friday, May 1, 2009
Nerf Guns – First Set

We’ve finally got some finished projects rolling out of the workshop in the new, exciting world of 1:1 scale! No more crappy cell phone cam pics, we’ve got something decent to look at today. So, without further ado, let make with some pics!
First up, we’ve got a batch of toy guns. These were done mostly as paint tests – being as how I planned to make such extensive use of spray paint on more involved projects, I felt it important to try out as many brands and colors as possible to see what I liked and what I didn’t. I didn’t want to spend a lot of time moding something only to have the work ruined by a crappy coat of spray paint, so for the most part I kept the modifications to a minimum on these.

This double-barrel 12 gauge started life as a cheap, dollar-store toy gun with electronic gun noises and a cute ejecting shell feature. I sawed off the barrel with a Dremel tool and saved the end for later, then started in on the stock. Originally the speaker was housed internally, mounted to one side of the stock behind a grill of small holes. As I was removing the stock, I had to come up with new mounts for the speaker and a new hand grip. I laid a sheet of metal foil mesh over the hole in the end of the hollow handle and glued it into place inside the stock. I didn’t take any in-progress shots, but you can still see the foil sheet: it is the silver screen over the speaker. The mesh served as a support structure for the putty I used to resculpt the handle. I shaved and sanded the two-part epoxy putty to get a flush blend with the plastic stock, but a bulge is still visible.

The speaker wouldn’t have looked right just set there in the “wood,” so to dress it up a bit I used a plastic ring from a cheep toy magnifying glass (and saved the lens for later). I cut off the handle from the magnifying glass and used it as a flexible cover for the battery compartment (also moved from the side of the stock and set into the putty) then glued the ring around the speaker before finally setting the speaker into the putty.

After that, this one was all paint. The metal barrels were painted with a rattle can, and the “wood” was primered in basic white. I achieved a wooden color over the molded plastic wood grain with a series of washes, basically random mixtures of all the old brown inks I’ve collected painting miniatures. I was really pleased with how well it looked like old, oil-stained wood. The copper accent pieces were also spray painted and lightly inked brown prior to final assembly.

At some point I plan to revisit this piece. I’d like to make a simple, low-slung holster for it to make the weapon better for issuing to under-costumed friends on deployment to Conventia. I also plan to mount small LEDs and batteries (basically just small LED throwies) inside the shot gun shells to give them a nice, “plasma inside” sort of glow. I should probably make some small ammo loops on the holster to show them off better.
Next, I’d like to take a look at “The Brass Monkey,” and 87-calibre Air Navy Revolver.

Yes, this is my (obligatory) Nerf Maverick mod. I didn’t do much at all to modify this pistol before painting it, although I did modify it so the cylinder would fall all the way to the side, but I really just wanted to see what I could get away with in terms of masking and multi-layer spray painting before I ruined the gun, so I picked one up at the thrift store for like $3 and just went to town on it. I ground off all the Nerf logos with a Dremel, and used 2-part epoxy putty to fill in some of the unwanted details – in looking at American Civil War revolvers, particularly the Colt Army and Navy models, one thing that stood out to me was the slightly more simplified lines of the Navy models, particularly around the cylinder, so I tried to imitate that look by smoothing out the grooves cast into the hemisphere behind the ammo cylinder. All the lines between colors were achieved by spray painting one color, masking it off with tape, and spraying on the next layer.

In terms of visual appeal, this method was quite effective. In terms of weapon functionality, it left something to be desired. Actually, I pretty much fucked this one up in that department. I lost on small internal spring, and ruined of the main spring that pulls the slide back into position. I was also way to liberal with the masking and painting, and I got paint onto areas that need to slide freely for proper operation. Oh, well – I set out to make a test piece, and that’s what I got. It’s valuable to learn things, right?
Again, color selection and paint brand choices, as well as clear coats, were selected to give me exposure to as many brands and variants of paint as possible. This one also got an all-over coat of ink to tone down the bright brass frame. The “.87” on the side of the frame is affected with simple stick-on raised letters from the scrap booking section of the local craft store. (I got the 87 by measuring the inner diameter of the barrel, not the actual size of the darts.) I’m very happy with the way this one looks, I just wish the damn thing still shot.

The really interesting detail on this gun, and the technique that I’ll be reusing later on other things, is the fake leather grips. I sanded off the little nubs that had been on the grip, and after everything else was painted I masked the gun to show just then handle and a small rectangular area on the sides of the slide. Then I sprayed these areas with textured spray paint, the kind that is supposed to look like stucco or, well, I don’t know what it’s supposed to look like, but the paint has fluffy, chunky material suspended in the paint. The more you spray, the more gunk builds up. I’ll play with it more as I go to see if I like it better with a heavy coating of gunk or a lighter dusting, but here I tried to put it on pretty evenly. Once it was dry I needed to make it look like leather – I’d used a light beige color I picked up for an as-yet unfinished 28mm shopping mall I was gonna make (I’m sure you’ll never guess what I planned on killing by the bushel in a shopping mall…). I’ve got notes on the exact mix someplace, but it was basically just a simple wash of strong brown ink, then a bit of matte finish clear coat. The leather grips are my favorite thing about The Brass Monkey, and I’ll definitely be reusing this technique.

Last but not least, I’d like to present this interesting but unnamed weapon for your consideration. Several names came up during this project, many involving words like Bootstrap, Blunderbuss, Bumble Bee, and keg, but they never really fell into the right mix for me. Oh, well. This one’s the most ambitious of the three, with the most sculptural modification and a few other new techniques. Oh, and this one still works, so its got that going for it, which is nice.

The gauges poking out at such an odd angle are, in fact, the end of the barrels I cut off from the shotgun. I cut the open end off at an angle, epoxied them onto the side of the gun, and built up half-decent mounting brackets from two-part putty. To make the gauge faces, I started by finding a company that sells custom gauges to hot-rodders with a nice catalog of available faces on their web page. Their low-res free samples looked just dandy when scaled down to about ¾ inch with a little color added in the GIMP.

The ends of the shotgun barrels were made as a separate piece of bright orange, “oh, god, don’t shoot me it’s just a toy,” plastic, which I simply removed and spray painted brass then glued in the new gauge faces. The hands came out of old pocket watches, held into place with tiny little brass nails (I picked those up 7 or 8 years ago, and they are still coming in handy. Check model shops that sell wooden ship models if you want some, they rule.) The lens effect is just several coats of brush-on thick gloss varnish, with a dab of brown ink added to one of the middle layers to take the edge off the bright white paper.

On the other side of the gun I mounted a small “magic 8 ball.” I have no idea what it’s supposed to do or why it’s there, it just looked really funny and I ran with it – hay, it is a pirate-themed magic 8 ball thing, ripped from the chest of a really awful toy figure. The fluid inside also matched the blue color I had in mind for the main body of the gun. It is set in the plastic shell of an LED “tea candle,” filled with putty to keep it snug. I drilled holes around it to give it a more “machined metal” shape, and totally lucked out by finding brass rings to fit in the spares box.

Other modifications were minimal – I drilled out two holes in the trigger, again to make it look more like machined metal. I added a small knob – I think the cog came out of an old printer -- to one side of the “keg” structure. It turns, but doesn’t connect to anything.
There were two techniques that I wanted to test out before using them on other, fancier, projects – fake wood over plastic, and air-mixing spray paint. I knew I was going to have shapes in the future that I couldn’t (or wouldn’t want to) replace or replicate, but that I would want to look like wood. I’d hit on the idea of using wood grained vinyl contact paper, the sort one might use to line a kitchen drawer, and needed something to test it out on. Everyone told me this would just never work, it wouldn’t stick, I wouldn’t be able to get it around all the corners, and well – that just meant that I had to try it. But they had a point, I really didn’t want to invest a lot in a project assuming this would work, only to get to the end and find out my who plan is crap. This gun (another thrift store find) was selected precisely because I hated it, so if I totally screwed it up somehow with the contact paper I’d only be out a few bucks and a couple of hours. It turns out that I had a lot of fun modding it and now I really like this gun, so I’m glad it worked!

Here’s the low-down: before I did any paint work but after all the sculpting was done I sat down with the gun, a sheet of contact paper (remember, they call it paper, but its plastic), an Xacto blade and a Bic lighter. I cut the paper to about the size I wanted for a given section, and just slapped it down – you may notice that I slapped too quickly on one side of one hand grip, and now the wood grain doesn’t line up. Don’t do that. I worked the contact paper over all the shapes and contours, cutting it away with the knife as I went. This needed to be done before painting, there’s no way I could do it without ruining the finish on the paint around the wood grain sticker. I used the lighter – sparingly – to heat the plastic and stretch it over curves and around corners and made sure to get the edges well stuck down. I really wish I could give you better pointers, but you’ve just got to get your hands on it. It’s actually pretty easy to do, but very time consuming. I can see why everyone said it wouldn’t work, without heat stretching it they would have been right. But in the end, I think it came out pretty good – but if you look for them you can find places where I didn’t get the sticker all the way back into a corner, or some bit of edge is peeling up. Its also next to impossible to get the contact paper over all 3 exposed sides of a rectangular corner without it wrinkling up. You can minimize this with careful heating and stretching, but its hard to do that enough to get it smooth without either rubbing off the wood print or melting right through the vinyl. I tried to use solvent-based model cement to soften the vinyl and glue down its edges, but this did more harm than good overall and I don’t recommend it.
This would probably be a good time to warn you – if you do this, which I do not advise, you are going to be heating flammable materials in your hands, probably right next to your face. I don’t have any idea what kind of fumes this crap releases when heated, but I’m sure they don’t contain vitamins or grant super powers. If you use too little heat and try to stretch the vinyl it will rip. If you use too much heat – meaning, if you hold the lighter too close for too long – it will melt and/or catch fire. If you tried that stupid trick with the model cement, it will almost instantly catch fire and spread to all near-by model cement, including any that may still be wet on your fingers. I don’t think additional details are necessary, let me just make this very clear – I do stupid shit in the work shop. Don’t be like me. It can give you cancer.
But that wood-grain vinyl contact paper stuff rules. I’m gonna be using more of it.

“Air Mixing” is a term I just made up to describe what I did to achieve the blued gunmetal finish on the main body of the gun. I couldn’t find a color like that in a single rattle can (I’m sure its out there, I just couldn’t find it). So I got a can of middle-grey gunmetal, and a bright blue metallic intended for model cars. After masking over the fake wood I sprayed a base coat of gun metal (more to get decent coverage and make sure the paint got into all the little corners and crevasses) I took one can in each hand and sprayed them both at the model in the same time, feathering the blue into the gunmetal as I went. This was all kinds of fun, much more “painterly” than the normal rattle can experience.
After that I masked again, to cover the blued metal, and sprayed brass over everything that was left. Then it was time to remove all the masks and see how it turned out. Well… if I was too liberal with the masking on the Brass Monkey, I was too conservative with it on Bootstraps Unnamed Wacky Thing. While none of the moving parts were impaired, you could still see lots of red plastic showing through in places that I really should have left exposed to spray paint. In the side view, you can very clearly see the red showing through in the groove for the charging handle. Less obvious but still noticeable is a rectangle around this groove where the brass color doesn’t quite match up. I’d left that whole area totally masked, so at first when I pulled the masks off there was a big, wide, red stripe down both sides of the gun. I touched this up with brush paint, as I did everywhere else I felt really needed it and it wouldn’t mess up the functioning of the gun.
The other problem I had when removing the masks was in several points they pulled up the vinyl contact paper. For the most part I was able to fix the damage, but there are places that looked nicer before they got tugged and pulled at by masking tape. I don’t have a good solution for this, other than to slow down, be careful, and never remove the mask over the vinyl from the edge towards the center, always pull the tape from the center first, moving out to the edge. That rule won’t apply in all situations, but it will help.
Still, I was well pleased with the effect I achieved with the vinyl wood grain and a heat-stretched application. I’ll definitly be using this technique again. I’m also very pleased with the blued gun metal. Its not quite as blue in real life as it looks in the pictures, and I think next time I’ll use less blue, but it was fun and now I know you can spray two paints at the same time for interesting effects.
So, there you have it – my first batch of SteamPunk styled custom toy guns. The three toys themselves cost me a grand total of about $10, but I spent considerably more on the spray paint – but I can defer that cost somewhat because most of the paints were also used for other projects.
Subscribe to:
Posts (Atom)